


A cracked screen, a battery that won’t hold a charge, or a charging port that’s stopped cooperating- these are the moments that push people toward attempting a repair themselves. The idea is appealing: save money, avoid a trip to a repair shop, and get the phone working again on your own terms.
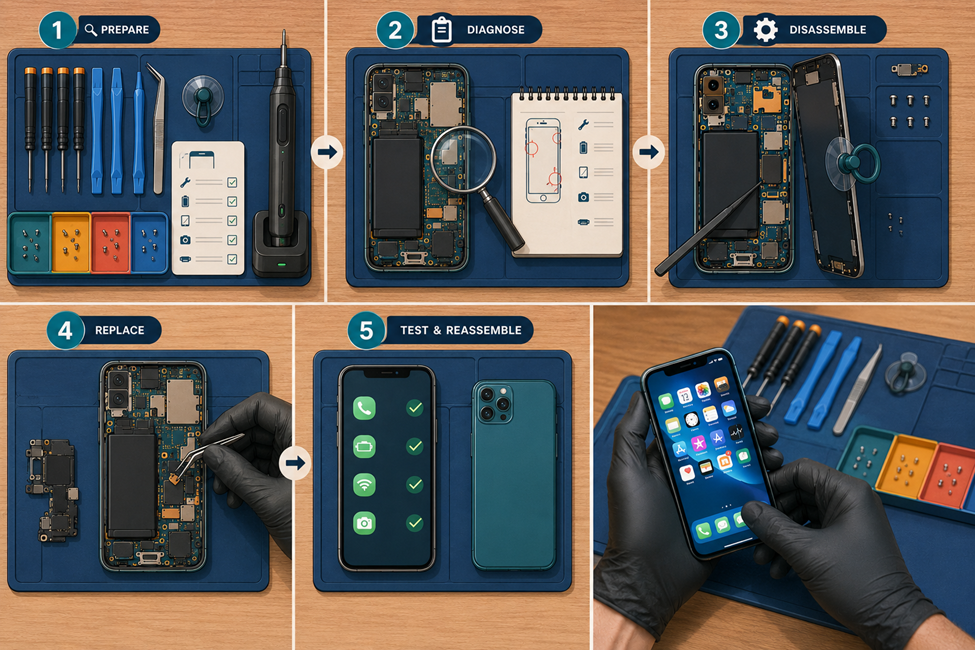
But a successful DIY repair rarely comes down to luck. It comes down to following a consistent workflow, one that moves from preparation to diagnosis to careful hands-on work, in that order. Skip a step or rush through it, and you increase the odds of turning a small problem into a much bigger one. Here’s a step-by-step approach that gives any repair the best chance of going smoothly.

Step 1: Gather the Right Tools and Set Up Your Workspace
Before you touch your phone, take the time to assemble a proper toolkit and a clean, well-lit space to work in. This preparation stage is easy to rush past, but it’s the foundation everything else depends on.
A solid set of Essential Mobile Repair Tools should include precision screwdrivers with interchangeable bits, plastic spudgers for safely prying open seams, a suction cup for lifting screens, fine-tipped tweezers, an anti-static mat, and a small magnetic tray or labelled containers for screws. Safety glasses are worth adding too, particularly for screen repairs where glass fragments are a real possibility.
Static electricity is an underrated risk here. Phone components are sensitive to even small electrical discharges, so grounding yourself before you begin, either with an anti-static wrist strap or by simply touching a grounded metal surface, protects the internal circuitry from invisible damage that might not show up until later. Once your tools are laid out and your workspace is clear, you’re ready to move on to figuring out exactly what’s wrong.
Step 2: Diagnose the Problem Before You Open Anything
Skipping straight to disassembly without a clear diagnosis is one of the most common ways a repair goes sideways. Before opening the case, spend time narrowing down what’s actually causing the issue.
Start with the obvious checks. If the phone won’t charge, try a different cable and charger before assuming the port itself is faulty. If the screen seems unresponsive, check whether it’s a software freeze rather than a hardware fault by attempting a restart. Document what you observe: when the problem happens, whether it’s consistent or intermittent, and any error messages that appear. This kind of methodical observation often reveals the real cause faster than jumping straight to conclusions.
For software-related symptoms, basic troubleshooting steps like checking for updates, restarting in safe mode, or in some cases a factory reset can resolve the issue without ever needing to open the device. For hardware symptoms, look for visible signs like cracks, corrosion, or loose internal connections once you do get inside. A clear diagnosis at this stage prevents you from replacing a part that was never actually the problem.
Step 3: Disassemble the Device Carefully and Methodically
With a diagnosis in hand, it’s time to open the phone. This is where patience matters more than speed. Rushing through disassembly is how connectors get torn, screws get lost, and screens crack that didn’t need to.
Work on your anti-static mat, in good lighting, and follow a trusted disassembly guide specific to your phone’s model, since internal layouts vary significantly between manufacturers and even between generations of the same device. Remove external components first, such as the SIM tray, back panel, and any visible screws, before working inward toward the battery and internal connectors. Disconnect the battery early if you’re working near the motherboard, since this reduces the risk of a short circuit.
Photograph each stage as you go. It feels tedious in the moment, but a visual record of screw placement and cable routing makes reassembly dramatically easier later on. If a component feels stuck, stop and reassess rather than forcing it, force is almost always what turns a manageable repair into an expensive mistake.
Step 4: Replace the Faulty Component With Precision
Once the problem area is exposed, it’s time to swap in the new part. This step rewards precision and the right equipment more than any other stage of the process.
For screw removal and reinstallation, Electric precision screwdrivers are worth considering over manual ones, particularly if you’re working through a repair with dozens of tiny fasteners in different sizes. They apply consistent, controlled torque, which reduces the risk of stripping a screw head, something that’s remarkably easy to do with a manual driver when you’re tired or rushing near the end of a repair. Pair this with good lighting or magnification so you can actually see what you’re doing when working with small connectors and delicate ribbon cables.
Match the replacement part’s specifications exactly to the original, generic or mismatched components can cause fit issues or reduced performance even when they technically work. Lay out your replacement parts in the order you’ll install them, and handle each one gently, especially battery connectors and display cables, which are among the easiest things to damage during this stage.
Step 5: Test Thoroughly and Reassemble
Before you seal the phone back up, power it on briefly to confirm the repair actually worked. This intermediate test, done before final reassembly, is one of the most valuable habits in the entire workflow, because it’s far easier to fix a problem while the phone is still open than after you’ve closed everything up.
Check that the repaired function works as expected: a new screen registers touch accurately across the whole surface, a new battery charges and holds a charge, a replaced port connects reliably. Once you’re satisfied, reassemble the device in reverse order, using your photos as a reference. Take your time reconnecting cables and seating components, and double-check that any water-resistant seals or gaskets are correctly positioned before closing the case fully.
Finish with a complete functional test: calls, cameras, sensors, and any other feature relevant to the repair you performed. Catching an issue now is far less frustrating than discovering it days later.
Conclusion
A successful DIY phone repair rarely comes down to raw skill alone; it comes down to following a clear process: preparing properly, diagnosing accurately, disassembling with patience, replacing components with precision, and testing before you close everything up. Each step builds on the one before it, and skipping ahead is where most avoidable mistakes happen.
If you find yourself stuck at any stage, or a repair feels more complex than expected once the phone is open, it’s worth pausing and considering professional help rather than pushing through uncertainty. But for repairs within your skill level, a methodical workflow like this one is what separates a smooth, confidence-building fix from a costly lesson learned the hard way.
You may also like to check out:
You can follow us on X, or Instagram, subscribe to our YouTube channel and even like our Facebook page to keep yourself updated on all the latest from Microsoft, Google, Apple, and the Web.
